Only released in EOL distros:
Package Summary
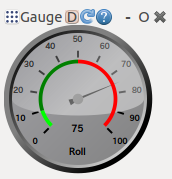
Launch virtual gauges for ROS topics.
- Maintainer status: maintained
- Maintainer: andyz <andyz AT utexas DOT edu>
- Author: alexvs <andyz AT utexas DOT edu>
- License: See License.txt
- Source: git https://github.com/UTNuclearRoboticsPublic/gauges.git (branch: master)
Package Summary
Launch virtual gauges for ROS topics.
- Maintainer status: maintained
- Maintainer: andyz <andyz AT utexas DOT edu>
- Author: alexvs <andyz AT utexas DOT edu>
- License: See License.txt
- Source: git https://github.com/UTNuclearRoboticsPublic/gauges.git (branch: master)
Package Summary
Launch virtual gauges for ROS topics.
- Maintainer status: maintained
- Maintainer: andyz <andyz AT utexas DOT edu>
- Author: alexvs <andyz AT utexas DOT edu>
- License: See License.txt
- Source: git https://github.com/UTNuclearRoboticsPublic/gauges.git (branch: master)
Contents
Launch virtual gauges for ROS topics.

Installation
Install the debian:
$ sudo apt-get install ros-indigo-gauges
Or, install from source to get the most current version:
$ mkdir -p ~/Desktop/catkin_ws/src
$ cd ~/Desktop/catkin_ws/src
$ catkin_init_workspace
Clone the package
$ git clone https://github.com/UTNuclearRoboticsPublic/gauges.git
$ cd ..
Build the package
$ catkin_make
Source the new files
$ source devel/setup.bash
(You may have to do this every time you open a new terminal window, or add this line to your bashrc: source ~/Desktop/catkin_ws/devel/setup.bash)
Launch
You can easily open a virtual gauge within the rqt GUI environment. Launch the main rqt window:
$ rqt --force-discover
(The optional argument here ensures that a new plugin is found.) In the menu, navigate to Plugins-->Visualization-->Gauges to add the gauge plugin. It will launch with some default parameters on the ROS parameter server. They can be adjusted from C++, Python, or the command line. See http://wiki.ros.org/Parameter%20Server. These parameters are numbered so you can launch several gauges with unique parameters. They are:
- "gauge_nameX" -- The name displayed below gauge X.
- "minimumX" -- The minimum value shown on gauge X.
- "maximumX" -- The maximum value shown on gauge X.
- "danger_thresholdX" -- Show a color band, with red beginning at this value.
- "topicX" -- The name of the topic that controls needle X.
- "pixel_sizeX" -- The width and height of gaugeX.
This example launches two gauges which listen to different topics (pitch and yaw):
$ rosparam set /rqt_gauges/topic1 /pitch
$ rosparam set /rqt_gauges/gauge_name1 Pitch
$ rosparam set /rqt_gauges/topic2 /yaw
$ rosparam set /rqt_gauges/gauge_name2 Yaw
$ rostopic pub -r 1 /pitch std_msgs/Float64 13
$ rostopic pub -r 1 /yaw std_msgs/Float64 57
$ rqt
Then select two Gauges from the drop-down menu.
Tips and Tricks
The folder 'scripts/rqt_gauges' contains a short Python script that will launch two rqt gauges and publish data for them. This is an example of automating the gauge creation process.
WARNING: This script deletes your rqt config, including all your saved perspectives!
To run it,
$ rosrun rqt_gauges gauge_script.py
Known Issues
The first gauge to launch sometimes fails to subscribe or has graphics glitches. A workaround is to simply close the first gauge and re-launch a new one.
