Contents
Note: This page is obsolete.
See the swiftnav_ros page, which is maintained by Swiftnav, for updated information on piksi and piksi multi. This page is retained for historical purposes during the transition to the Swiftnav-maintained page, and may be deleted in the future.
Description
This package is a ROS release of a driver for Swift Navigation's Piksi RTK GPS receiver module. A pair of Piksi modules connected by a wireless link provides the location of each receiver relative to the other with accuracy as good as a couple of centimetres, and in addition, each Piksi module provides its location with typical GPS accuracy (about 3 meters). Typically one module is a stationary base station, which may be located at a surveyed point, while the other is mounted on a rover and provides ROS navigation software with a highly accurate position relative to the base station.
See Wikipedia's Real Time Kinematic article for an explanation of RTK GPS. It is important to understand that RTK GPS does not give a 2cm-precision absolute position (lattitude/longitude). It gives a 2cm-precision position of a rover relative to a base-station. If the base station is at a surveyed point the relative position of the rover can be converted to an absolution position, but the RTK position reported by Piksi is its position relative to the base station.
Other configurations of two modules are possible, such as placing both on moving platforms. Each Piksi computes its position relative to the other. This symmetry of operation enables the robot's position to be found using position data from either the base station or the rover.
In a configuration with a base station and a rover one unit can be standalone (no attached computer, only a power supply) while the other is connected to a computer that guides a robot.
This driver also publishes major status and diagnostic information on diagnostic topics.
It is crucial to a successful integration of Piksi into your robot that you understand Piksi's and the antenna's mechanical, electrical, and performance characteristics. Refer to the Piksi deployment guide.
Published data
This driver publishes the following data on the ROS topics listed.
Topic |
Message Type |
Notes |
gps/fix |
sensor_msgs::NavSatFix |
GPS lat/long. Variance is populated with the Horizontal Dilution of Precision (HDOP) squared. |
gps/rtkfix |
nav_msgs::Odometry |
Position relative to base station. See REP-103 for the definition of the ENU coordinate frame, in which the relative position is expressed. If Piksi is in Fixed Mode (has an rtk fix), variance is populated with the reported rtk horizontal accuracy; otherwise it is populated with the value 1000. |
gps/time |
sensor_msgs::TimeReference |
GPS time |
The frame_id field of messages is populated with "gps".
Hardware
You need:
- A Piksi RTK kit containing a pair of Pikis with associated radio link over which they exchange GPS correction data, and associated mounting for the device and antenna (ground-plane recommended). RTK GPS is very sensitive to obstacles between the receiver and the satellite, and both modules' antennas must be located with a clear view of the sky or they will not work properly.
- A way of powering one of the Piksis through it's USB cable. It does not need to be attached to a computer - it can be standalone and can be powered by any device that provides power on a USB connector, e.g. a USB AC adaptor or a battery with USB output.
- A ROS computer attached to the other Piksi with this package and associated software installed.
Software
The swiftnav_piksi package is supported on ROS indigo and jade. Currently, you must build it from source, and also build a supporting non-ROS library: libsbp, from source.
Build And Install libsbp
The following steps build and install libsbp, which is needed to support the swiftnav_piksi package. Clone libsbp into a local directory, and build and install it. Comments follow a # below - they explain the step; do not type them. Caution: do not build libsbp in your catkin workspace - it is not "catkinized".
cd mysrc       # cd to a directory where you will download and build libsbp
git clone https://github.com/PaulBouchier/libsbp
cd libsbp/c
mkdir build
cd build
cmake ../
make
sudo make install   # install headers and libraries into /usr/local
Build and Install the swiftnav_piksi driver
The following steps build and install this package into your catkin workspace.
cd catkin_ws/src       # your catkin workspace
git clone https://github.com/PaulBouchier/swiftnav_piksi.git
cd ..
catkin_make
Build and Install the Piksi Console
The Piksi console is an important utility for verifying correct operation of Piksi, and for monitoring it. To run on Ubuntu, it must be built from source. Follow these instructions to build and install the Piksi Console.
Running Piksi with ROS
Follow the steps in the Piksi User Getting Started guide. After doing so, you will know how to use the Piksi Console to run Piksi in simulation mode (can be done indoors) and also how to make it report the rtk position of the rover relative to the base station (must be done outdoors).
Simulation Mode with rviz
You can do this test indoors.
Start simulation mode
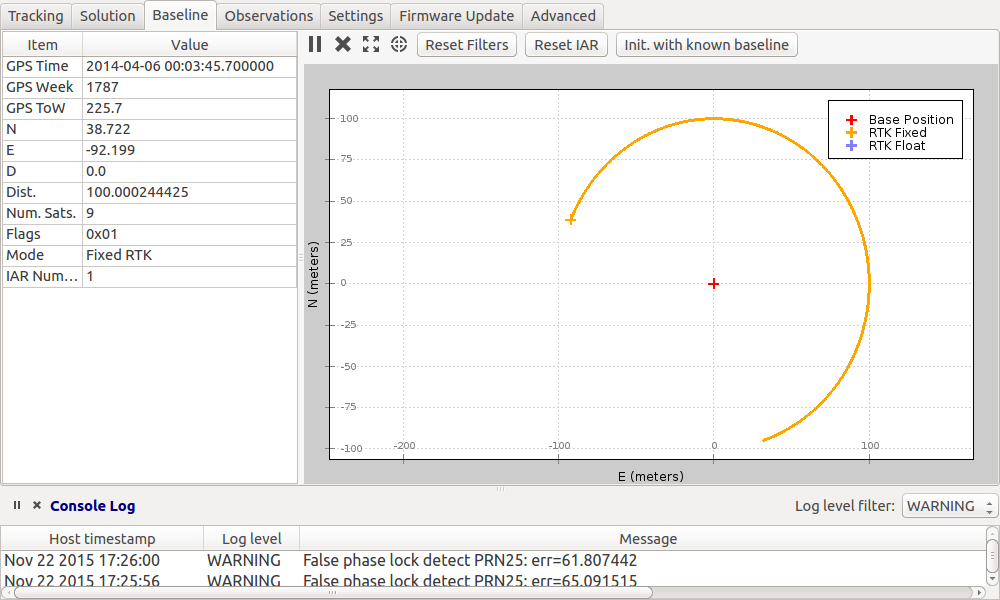
With a Piksi connected to your ROS computer, start piksi_console and put the Piksi into simulation mode. Observe the simulated vehicle path on the baseline tab as shown below. 
Start the ROS Driver & Diagnostics
Exit from piksi_console and launch the swift_nav piksi demo script. The demo script launches both the driver, which publishes data from Piksi, and also a diagnotic monitor.
Note: the Piksi is assumed to be at /dev/ttyUSB0. If the Piksi serial port is different, edit the port parameter in swiftnav_piksi/launch/swiftnav_piksi.launch.
roslaunch swiftnav_piksi swiftnav_piksi.launch
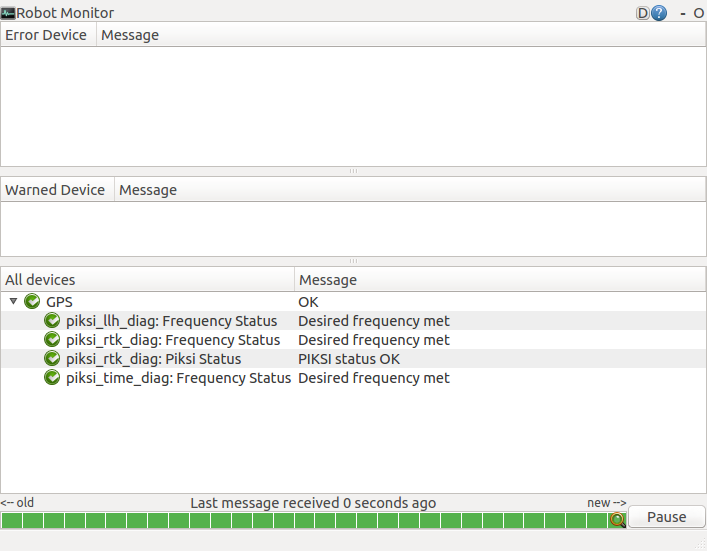
In a different window, start rqt_robot_monitor which displays status of the Piksi interface. Observe the rqt_robot_monitor window, which should show OK status for GPS.
rosrun rqt_robot_monitor rqt_robot_monitor

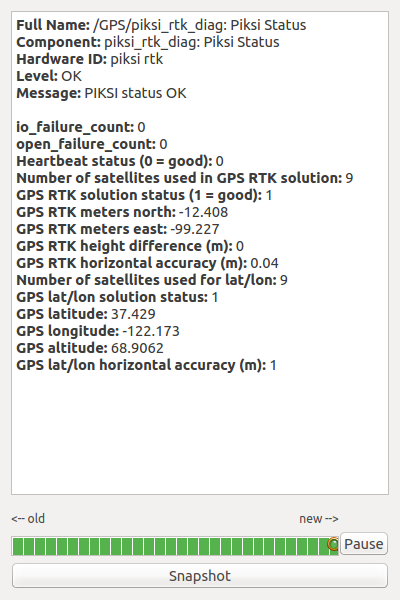
Expand GPS and double-click piksi_rtk_diag:Piksi Status. You should see GPS RTK meters north and east varying as the simulated vehicle travels in a circle. 
View simulated path in rviz
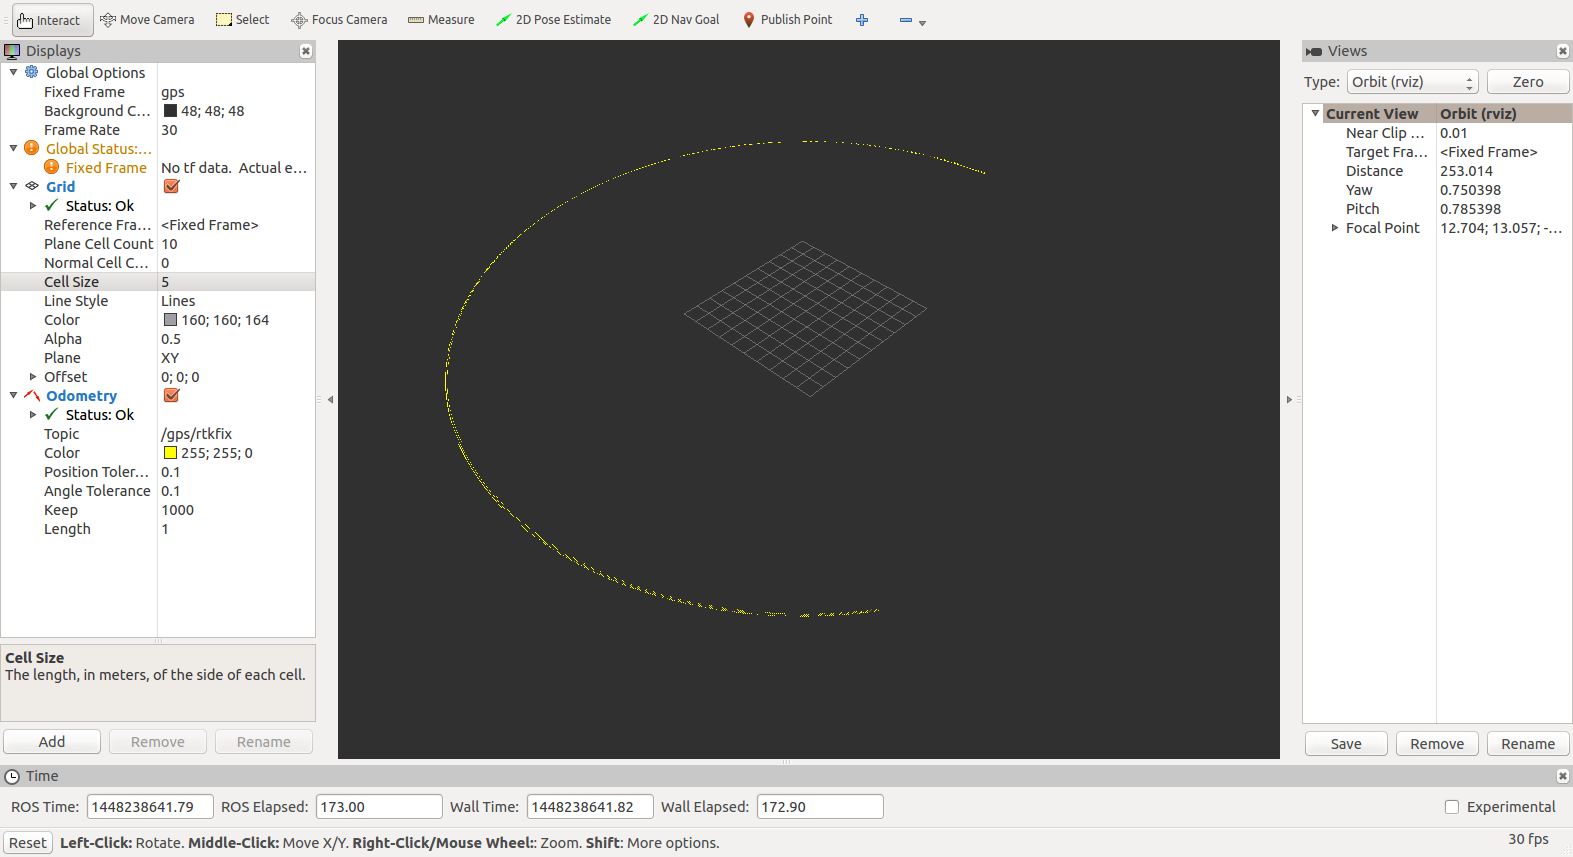
In another terminal, start rviz. In "Global Options" change the fixed frame to "gps". In Grid, set Cell Size to 5. Click Add -> By Topic and add the Odometry message under /gps/rtkfix. Change it's color to yellow to make it more visible, set "Keep" to 1000, and zoom way out. You should see the simulated vehicle circling the grid at a large radius as shown below. 
RTK mode with rviz
This test must be done outdoors, with a clear view of the sky. Take care not to obscure the antenna's view of the sky with your body.
- Power one Piksi, which will be the base station, and sit it outside in an open area with the antenna on a ground-plane.
- Connect the other unit, which will be the rover, to your ROS computer and take them both outside and sit the rover's antenna on a ground-plane close to the base station's antenna.
- Run piksi_console and ensure simulation mode is false.
- On the Baseline tab, wait for the mode to change to "Fixed RTK", indicating that the two Piksi's are in RTK (high precision) mode. The baseline plot should show the Base Position and RTK Position close to each other, and Dist. should be the actual distance between them (in meters).
- Exit piksi_console
- Start rviz and add the Odometry message under /gps/rtkfix as described above.
- Walk around and observe your track in rviz.
Use Piksi with your ROS Robot
Congratulations! You have now successfully integrated Piksi with ROS, and can use its RTK-GPS accuracy with other ROS software for your outdoor robotic projects.
Tips, Tricks, and Support
- Piksi needs a clear view of the sky, without nearby tall obstacles to work properly.
- Like all RTK GPS devices, Piksi is susceptible to "cycle-slip", and in some cases you may see an error in reported position that is a multiple of the GPS carrier wavelength (22cm).
- If the swiftnav_piksi driver isn't publishing data, it may not be getting connected to the serial port. Run piksi_console as instructed in section 4.3 of the wiki page with piksi in simulation mode as instructed in the link in section 5 that should take you to the Piksi User Getting Started Guide. If it doesn't work that indicates a serial port problem. The most common fault is that you aren't a member of the dialout group. Run minicom and see if you're getting data from the serial port on the serial device. Perhaps your serial port isn't at /dev/ttyUSB0 (some USB-serial ports turn up at /dev/ttyACM0. Look at the ROS logfile for errors - perhaps the serial port wasn't opened successfully.
If you follow the instructions above, and the piksi console works but you don't get any data published to topics, and rqt_robot_monitor shows no rtk or llh data but time is getting received, you may have run into a known problem where you built the swiftnav_piksi driver against a wrong version of the libsbp library. Swiftnav changed the message numbers in libsbp for piksi multi support in a way that was incompatible with v2 piksi. Consequently, v2 piksi would send messages which would be interpreted incorrectly by their latest libsbp library, so the swiftnav_piksi ROS driver would never get any valid messages. The fix is to delete libsbp and swiftnav_piksi and re-clone them using the updated procedure in 4.1 & 4.2.
File issues and questions at https://github.com/PaulBouchier/swiftnav_piksi
Acknowledgements
Thanks to Scott K Logan and Caleb Jamison for authoring this driver and contributing it to the community.
